


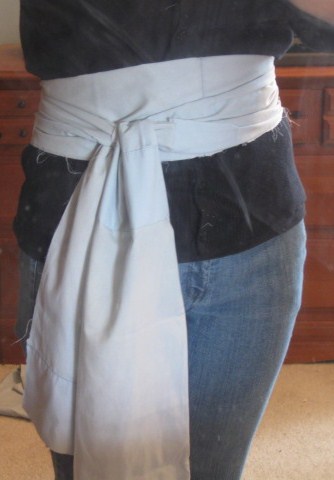
Here it is! I made this apron on Friday afternoon out of two worn out pillowcases. The design is inspired by an apron I talked about in this post. Isn't it cute? (Sorry about the smudgy mirror pictures!) Below are instructions for how to make one for you! If they are not clear please tell me in the comments so I can explain it better. It's really pretty simple.
What you need:
2 pillowcases (small ones if you have them)
Thread
Scissors
A few hours

Start with two pillowcases. I used king sized ones, but I think it would have worked better with small ones.
First, we are going to work on the waistband.

Set one of your pillowcases aside. The other one you're going to cut down both sides to open it up into one big piece. (The two ends of this piece had been the opening of the pillowcase.)

Next you are going to cut that piece lengthwise down the middle to get two long strips.
Cut one of these strips in half. Sew one of the half pieces to the long strip. You may want to cut off the hem of one side of the long piece before sewing your half piece to that side. I don't have any pictures of this step because I messed it up and only later realized that this is what I should have done, so tell me if these instructions are unclear. : )
Fold this in half lengthwise and try it on! (Don't sew it in half yet.) This is what your waistband will look like.
At this point you want to hem one long edge of your waistband piece.
Next, cut your second pillowcase down the sides, to open it up into one big piece. The same as the first thing you did with the first pillowcase. Hem one long side of this piece.
Pin the ends onto the middle part of your waistband piece, out as far as you want your apron to come. You may want to measure, I just guessed. Make sure you are pinning it right sides together. The unfinished edge of your apron piece should match up with the finished edge of your waistband.
Next you find the middle of your apron piece and the middle of your waistband piece and pin them together.

It should look something like this now.
I am using this pleating technique, so if you need more pictures for this part, look at the link.
Basically just keep finding the middles of each section and pinning them together until the pins are pretty close together, maybe a couple of inches apart.
(Hint: If you can, try to put the middle seam into one of the pleats so that it doesn't show as much. I didn't do this, and it looks okay, but it would be better if you couldn't see the seam down the middle of the apron.)
Now you want to sew the pleats onto the waistband the way you've pinned them, taking out the pins and folding over the pleats towards yourself as you go along.
It might be a good idea to make sure you have bobbin thread before you sew the pleats. I did almost the whole thing before I realized it wasn't actually sewing.

It should look like this when you're finished.
The last step is to fold down the waistband in half so it covers the wrong side of the pleats, fold it under to make a nice edge and sew it.


And there you have it! What I love about this apron is that it looks stylish, but the only thing it cost me was one afternoon. The pillowcases were dingy ones we didn't use anymore. They made awful pillowcases, but as an apron they work. I can feel comfortable wiping my hands on it because I know it is made out of recycled fabric that nobody wanted.
Let me know if you make this apron! I want to see what you guys can come up with. I think it would look really cute with two different pillowcases in coordinating fabric.
I will not be posting anything tomorrow, I'm afraid. I just found out in speech class that I have to give my persuasive speech on Wednesday, and I am not ready. I will be busy working on that tomorrow.
Good luck making your own pillowcase aprons!
~Jane~


2 comments:
Sew cute! Yes, I know that was cheesy! =) I love how it turned out, & to think it was previously two plain old pillow cases. Cleverness! =)
Hope you have a great Easter!
-Bess-
P.S.: I'm planning your "ad" =) for after sometime next week! Sorry it's taking so long, but Easter is becoming a busy time for me!
great job! I think I will make one tonight!
Post a Comment